Intro
I bought 2 Netgear WAX214 access points a few years ago and while they work fine they have a very slow UI and are very clunky to use. The UI is clearly forked from OpenWRT so every few months I search on the OpenWRT forum to see if they are now supported and recently I found that someone had done the necessary work. There are instructions in the forum that I followed which were already a great improvement on the original barebones description but I still had several questions that I needed to answer during the first install so I wrote down my process. Several things are needed before we start.
Serial cable
A USB serial cable is needed, the one I bought had standard breadboard female connecters which are too large to fit the connecter. As each cable was less than 1€ I bought two JST connectors with 1.25mm pitch, one with four connectors and one with three; there are four pins on the board but we'll use only three. I wasn't sure if the 4 pin connector would fit and was relying on being able to force the 3-pin connector in.

In the end they both appear to fit but I used the 3-pin connector connected to the three pins on the right side of the connector with the board oriented as in the picture. None of the colours matched so ignore those.


The UART connection labeled J9 is located in one corner. The pin assignment is as follows from left to right: VCC, GND, TX, RX.
- Red: +5V
- White: RXD--> connect to TX (yes, TX)
- Green: TXD --> connect to RX (yes, RX)
- Black: GND--> connect to GND
- Yellow: RTS
- Blue: CTS
Power supply
The WAX214 is PoE powered but we'll need the network port to be connected to a PC so you'll need a separate 12V power supply. The WAP states that it needs a 1.5A supply but the one I had lying around was only 1A and it worked without problem.
OpenWRT images
During this process there will be no internet on the NIC connected to the WAP so download the following two similarly named, but different, files:
- This is the temporary version of OpenWRT that will run in RAM to allow us to flash the final version openwrt-qualcommax-ipq60xx-netgear_wax214-initramfs-fit-uImage.itb
- This is the final version we will be using openwrt-qualcommax-ipq60xx-netgear_wax214-squashfs-factory.ubi
Network tools
Install the following packages on the PC if not already present. Putty is better known as a Windows SSH client but can also be used for serial connections. TFPT is a file server that serves files to network connected clients that we will use to transfer the temporary OpenWRT version.
user@linux:~# sudo apt install tftpd-hpa putty
user@linux:~# sudo systemctl start tftpd
user@linux:~# sudo systemctl status tftpd  # confirm that it started
Place the file openwrt-*-initramfs-fit-uImage.itb in the tftp delivery folder which defaults to /srv/tftp.
Setup serial connection to the WAX214
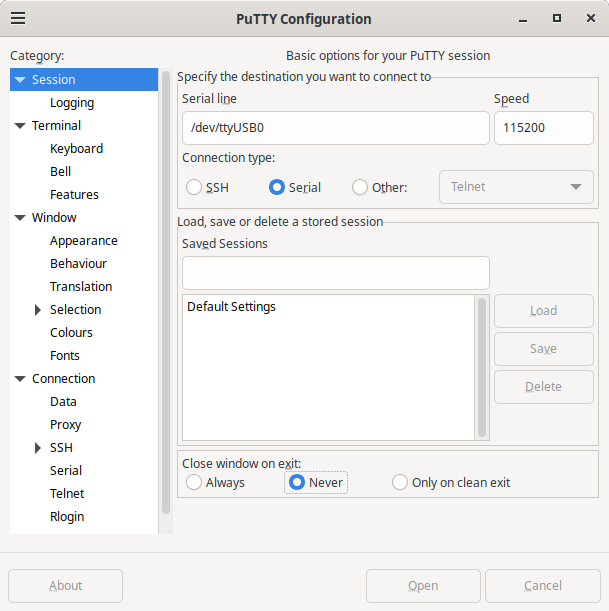
Find the COM port of the serial adapter on the PC by looking in /dev, it will look like /dev/ttyUSB0. This is only available to root and while there are more elegant ways to solve this, I simply started Putty with root permissions by typing sudo putty in a terminal. Start a telnet connection with the serial device, 115200 baud, 8N1 (this is the default but if you need to verify it, it's under Connection->Serial), the Putty window should look like this.
Make sure the Putty console window is selected (so our later keypress is registered), connect the power to the WAX214 and press 4 to interrupt the boot process. If everything else worked you will be dropped to a console. If you see garbage, the connections are likely incorrect and if you see sensible scrolling output but you can't stop it, the connections are probably loose.
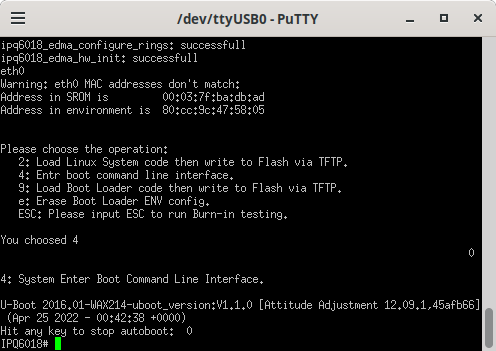
The WAX214 has 2 root partitions, the last two lines of cat /proc/mtd show them to be mtd11 and mtd12. Set the first of these to be active (this is needed for later when we install the firmware to a partition):
IPQ6018# setenv active_fw 0
IPQ6018# saveenv
Setup network connection to the WAX214
The WAX214 and the PC must now be connected via the network. Connect a regular network cable between the two and assign the fixed IP address 192.168.1.66 to the adapter on the PC. Set the addresses in the WAX214 as follows:
IPQ6018# setenv ipaddr 192.168.1.1
IPQ6018# setenv serverip 192.168.1.66
IPQ6018# saveenv
The next line retrieves OpenWRT from the connected PC via TFTP to allow us to run a temporary version of OpenWRT in RAM, this is not the final version we will flash. From the serial console type
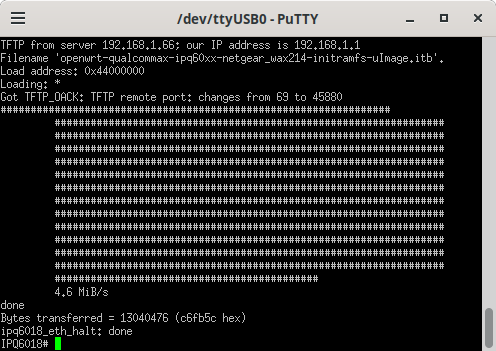
IPQ6018# tftpboot openwrt-qualcommax-ipq60xx-netgear_wax214-initramfs-fit-uImage.itbThis transferred 13Mb in around 3 seconds, with the screen looking like this:
Then reboot the router into OpenWRT with the below command. I found that the scrolling text stopped after about 22 seconds with no indication of success or failure but hitting enter dropped me to the OpenWRT command line.
IPQ6018# bootmWrite OpenWRT permanently
Now we have to write OpenWRT permanently to the root partition. To do this, we copy the image to the router using scp from the router. The instructions I used suggested running scp from the host PC but that gave an error saying that an sftp connection couldn't be made. If, like me, you didn't notice that two different files are needed and you put the .itb file in the TFTP directory the flash will fail gracefully when it checks the eraseblocks and you'll need to use the .ubi file and start again.
root@OpenWrt:~# scp user@192.168.1.66:/path/to/file/openwrt-qual*.ubi /tmp/The image can then be written to the root partition. Since we have set our active partition to 0, we must write to mtd11 (alternative would be active partition 1 and writing to mtd12):
root@OpenWrt:~# ubiformat /dev/mtd11 -f /tmp/openwrt-*.ubi -y
root@OpenWrt:~# reboot
After the reboot, OpenWRT will be installed. While you're still connected to it you should set it up as an access point matching your network settings so from the host PC which still has a static IP of 192.168.1.66.
user@linux:~$ ssh 192.168.1.1
root@OpenWrt:~# vi /etc/config/network
and adjust the lan interface section as follows assuming that 10.42.0.1 is the IP of the main router serving IP addresses and that 10.42.0.3 is outside the DHCP pool.
config interface 'lan'
    option device 'br-lan'
    option proto 'static'
    option ipaddr '10.42.0.3'
    option netmask '255.255.255.0'
    option gateway '10.42.0.1'
    option dns '10.42.0.1'
After this the access point can be disconnected from the PC and moved to its' intended location where I'm assuming it'll get rebooted in the transfer from 12V supply to PoE. This image does not have luci so it'll need to be installed as follows:
user@linux:~$ ssh 10.42.0.3
root@OpenWrt:~# apk update <--to download the package lists which are currently empty
root@OpenWrt:~# apk add luci
Then it can be accessed via browser at http://10.42.0.3.